Thursday, November 23, 2017

Bloody Bucket: Campaign Turns 1 & 2

This past weekend, we were able to get started on the Bloody Bucket campaign. The first campaign turn was spent with map movement, so can't be chronicled here (both protagonists read this blog). 

But the second turn saw the first battle as Mel, playing the German commander, was able to launch an attack on Battlefield Three (in the center of Holzthum) against Michael's Americans. Husband and wife are about to duel!!

For campaign briefings, see here.

Background
This scenario sees the Germans attack into the centre of Holzthum from Assembly Point B, as an Attack & Defend scenario. The Germans begin with all of their Patrol Markers along the edge indicated depending on their approach route.  In all situations the US player will place all of his Patrol Markers on the spot on the main road, as shown by the Allied Star.


The US player fields one platoon of infantry with whatever support options that have been allocated to this table for that Campaign Turn.

Supports for this battle:

1 x sniper
1x .50 cal HMG team
1 x 57mm AT gun & crew

Men's Opinion: 0
CO's Outlook: Thoughtful
FM Modifier: 0
Support Modifier: 0

Force Morale: 8


The German player has a total of 12 support points available when this scenario is first played. On subsequent turns the German player adds a further three points if the game occurs on Day One, five points on Day Two. 

The basic force in this battle is a Volksgrenadier Sturm platoon.


Supports purchased for this battle:

1 x LMG section
1 x senior leader
1 x pre-game bombardment
2 x panzerschreck team

Men's Opinion: +3
General's Outlook: Confident
FM Modifier: +2
Support Modifier: 0

Force Morale: 11


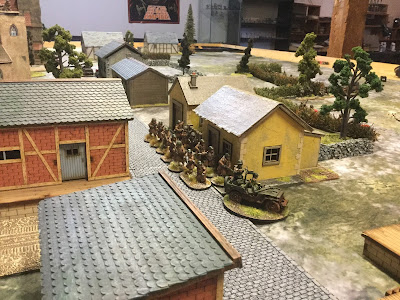
Initial impressions were that the Germans would have some issues having to cross the open ground in front of the town, especially since all German troops are Green. These fears were realized in the Patrol Phase when two of the German JoPs ended up on the table edge. Only one was in a decent position along the hedges in the center. The Americans ended the phase in a comfortable position among the buildings.


The German commander decided on a two-pronged attack. The main thrust would go straight down the center supported by a wide flanking movement to the left.

The German commander began by deploying a LMG section and a senior leader (with the rifle grenadiers) along the hedge. The American commander countered with a rifle section in the buildings.


 The LMG section begins its move forward.


The German flanking movement begins. An LMG section dashes froward from the baseline, helped by multiple double phases.


In the center, German sturm sections deploy.


An American rifle section deploys and prepares to counter the German flanking move.

Again aided by the multiple double phases, the German sturmtroopers dash forward under a hail of grenades and assault one of the buildings. This first assault was predictably bloody. The attacking Germans were destroyed and the remainder of the American defenders pinned.  Luckily, the German commander had another sturm section waiting to go and sent them forward. This time, the assault was the proverbial cake-walk (what is a cake-walk, anyway?). The pinned American section was destroyed and enough Force Morale was lost to drop the American level to less than 3. 
German victory!

As it turned out, the concern over the green quality of the German volksgrenadiers was perhaps overstated. The firepower of the sturm sections and the two LMGs was more than enough to make up for the lesser troop quality. This was especially true in the assault when the sturm sections provided three extra dice per trooper. The wide flanking movement by the German LMG section seemed not to have done much but, in retrospect, it did force the American commander to commit an entire rifle section as a counter. This ultimately weakened the main defensive line. Another factor that seemed to have helped the Germans was the quality of the NCO corps. There is a special rule that makes them harder to hit as leader casualties. This advantage may take a few games for its potential to be fully realized.

With this first victory, the German commander has decided to invoke the Blitzkrieg campaign rule and push onto the next battlefield in the same campaign turn. This move could prove to be a double-edged sword. On one hand, the lure of winning two battles in one campaign turn could potentially speed up the German advance (and speed is of the essence in this campaign). On the other hand, the current force and supports must be used for the second battle in the Blitzkrieg, before adjusting for battlefield casualties in the first battle. And no new supports may be purchased. As well, if the germans lose any battle in a campaign turn, the initiative shifts to the Americans. Regardless, the Germans will now attempt to take Battlefield Two.


The remaining German force for the second battle of the Blitzkrieg:
2 x senior leader (one with a light wound)
2 x panzerschrek team
1 x sturm section
2 x LMG section


Wednesday, November 22, 2017

ImagiNations: Battle of Wolfsburg (Nov 18, 1747)

While the central powers of Gourmandie and KaiserReich (and their attendant and somewhat diminutive neighbours) have enjoyed a period of relative peace over the last year, Grand-Duke Pierre-Louis of Gourmandie, at the urging of his mercurial army commander, Jean Lafitte Roquefort, Marquis de Fromage, and in response to recent KaiserReich increases to the tariffs on grain shipments, moved a portion of the Gourmandie army into KaiserReich territory. The army's movements were intended merely to cow The KaiserReich Council of Twelve and KronPrinz Friedrich Wilhelm and force the reversion of the tariffs. Unbeknownst to the Marquis de Fromage, the Kronpronz himself was in the vicinity with the majority of the KaiserReich army and presented a serious obstacle. The Marquis, hot-headed and obstreperous, decided to push the issue and moved to take the strategic crossroads of Wolfsburg, west of the fortress of Marzberg. The Kronprinz calmly deployed his army around the environs of Wolfsburg and awaited the Marquis' advance...


Gourmandie army deployed on the left and KaiserReich to the right around the outskirts of Wolfsburg.

Ulanen Radeburger, deployed on the left flank of the KaiserReich army. They began the battle isolated beyond a river course crossable only at two points. To make matters worse, their infantry counterparts in the Freikorps Radeburger decided quite early on that this was not a good day to die and promptly shuffled off to find easier pickings amongst the local residents (i.e. a blunder had them exit the table).

KaiserReich infantry await the enemy advance.

Mercenary gunners from Libagioni man the heavy siege guns in the KaiserReich lines.

Kronprinz Frierich Wilhelm (second from the right) confers with his Chief of Staff, Baron Jenssen of Bisterstad. The Kronprinz's younger brother and his military tutor look on disinterestedly.

A local resident seeks salvation at a roadside shrine, in anticipation of the day's events.

KaiserReich fusilier regiments hold the center of the line, with grenadiers and heavy howitzers on their left.

KaiserReich heavy cavalry, encouraged by Reichsritter 
Hildebrandt Freytag, hold the right flank (Grenadiere zu Pferde Warsteiner & Pistoliere von Doppelbock).

Facing them are the three squadrons of the elite Grenadiers à Cheval Boursin, led by Georges leRoque, Comte de Boursin.

The Gourmandie guard & grenadier brigade prepare to advance. The Marquis has decided to not waste time. The elite infantry and heavy cavalry will both assault the KR left flank.

The respective lines of heavy cavalry, about to clash for supremacy of the flanks of the infantry lines.


As the cavalry melee commences on the Gourmandie left flank, the guards & grenadiers advance to engage the KR fusiliers.

KR fusiliers wheel to flank the Grenadiers de Champaigne (red coats with yellow facings) but the Chasseurs-Gardes (grey coats, green hat trim) arrive to support.

The Fusilier-Gardes push back the KR fusiliers and relieve the pressure on their grenadier brethren.

The Grenadiers de Camembert, having swept aside the defending heavy guns, are met with a ferocious charge from the Kronprinzs östlichen Kavallerieband. Yes, they are musicians... but scary musicians!!

The grenadiers are shaken but win the melee and the KR horse falls back, leaving a gap in the lines.

Even though the Oettinger Grenadiers have moved forward to hold the KaiserReich line, two KR battalions are now faced with four Gourmandie guard and grenadier battalions. Things are looking grave for the Kronprinz on this flank.

After several inconclusive back and forth charges and melees between the KR and Gourmandie heavy horse, the KR horse grenadiers were left isolated and shaken. Seeing their chance, the Dragons Grand-Duchesse galloped across the field and, despite their smaller numbers routed, their heavier opponents.

This left the KaiserReich right flank exposed to the five remaining Gourmandie cavalry squadrons. Admittedly, three of these were shaken but they had swept the entirety of the KR horse from the field. 

According to the Marquis' plan, the majority of the action had taken place on the Gourmandie left flank, where the Marquis had deployed the elite Gourmandie infantry and heavy cavalry. The Marquis had left his right flank anchored on his heavy guns, hoping this would be enough to fend off any KR attempts to turn that flank. The hope was realized, as the only serious attack came in the form of a disjointed move by cavalry of Freikorps Radeburger. The necessity of crossing the river before deploying made the KR attempts on this flank less than ideal. The Gourmandie heavy guns easily swatted away this attempt and no more of consequence occurred on the right flank.

As with many of our ImagiNation battles, the action was ultimately decided by the cavalry battles on the flanks. In fact, the close fight between the KR fusiliers and the Gourmandie guards and grenadiers was inconclusive and could have gone either way. Eventually, however, the Gourmandie victory in the cavalry battle threatened the integrity of the KR right flank and Kronprinz Friedrich Wilhelm was forced to concede the field. 

The KaiserReich commander must now pull his army back to the east and decide if this Gourmandie aggression will be avenged. But winter is coming...


Thursday, November 9, 2017

Chasseurs à Cheval - elite company

As a break from French infantry, I pulled some lovely Front Rank miniatures from the lead mountain and got to work.  This unit represents the elite company of the 9e Régiment de Chasseurs à Cheval, with their peculiar orange/pink facings. Although I find painting cavalry a hard slog, as soon as I had started these figures, I jumped onto the Front Rank site and immediately ordered enough figures for another 8-figure standard company/squadron of chasseurs to go with these first figures. They have already arrived (in less than 10 days, order to delivery, UK to Canada!) and have entered the prep and priming stage. This will give me two light cavalry groups (+ two Big Men) for our Sharp Practice games.


 I realize some may say the green used is not dark enough but I paint for the 3+ foot viewing rule. From a distance, the colours darken; thus the lighter tones from a closer perspective.


Elite company officer, awaiting some grass tufts for the base to tart 'im up!